Image Hosted by ImageShack.us
Facebook Twitter Pinterest Instagram Google+ Blog
Showing posts with label diy. Show all posts

Tuesday, July 15, 2014

Not Your Grandma's Recipe

Hello dolls!
Today I am here with the BEST brownie recipe in the world. And no this is not an exaggeration but rather the truth! 
And once you try one of these babies you will agree. I know it!
These aren't your typical brownies. Like I said, these are the BEST brownies. They even beat out Grandma's! (Sorry Gma)
Without further a-do I bring you the recipe for Slutty Brownies!
These babies are oh so easy and a little bit filthy.... hint the name!

Slutty Brownies!


What You Will Need:

For the Brownie Layer:
  • 10 tbsp unsalted butter
  • 1 1/4 cups white sugar
  • 3/4 cup cocoa powder
  • 1/2 tsp salt
  • 2 tsp vanilla extract
  • 2 large eggs
  • 1/2 cup All Purpose flour
For the Oreo Layer:
  • 1 package of Oreo (regular stuffed or double stuffed)
For the Cookie Dough Layer:
  • 1/2 cup unsalted butter (at room temp)
  • 1/4 cup brown sugar
  • 3/4 cup white sugar
  • 1 egg
  • 1 1/4 tsp vanilla extract
  • 1 1/4 cups AP flour
  • 1/2 tsp salt
  • 1/2 tsp baking soda
  • 1/2 tsp baking powder
  • 1 cup semi-sweet chocolate chips

Instructions:

  1. For the Brownie layer:
  2. In a medium sauce pan, melt the butter over medium high heat. Add the sugar and cocoa powder once the butter is melted. Whisk to combine and remove from heat. Add the salt, vanilla and eggs and continuously whisk until the eggs are combined. Add the flour and continue to mix. Set batter aside.
  3. For the Cookie Dough layer:
  4. Cream together the butter and sugars in a mixer. Add the eggs and vanilla, making sure to scrape down the sides of the mixing bowl. Add the flour, salt, baking soda and baking powder and mix on low until everything is incorporated. Fold in the chocolate chips. Set dough aside.
  5. Assembly:
  6. Pre-heat the oven to 350 degrees.
  7. Line the bottom of a 9x9 baking pan with tin foil and then spray the tin foil with a layer of baking spray.
  8. Layer the cookie dough on the bottom of a 9x9 baking pan, pressing down to form the bottom of the slutty brownies.
  9. Layer as many oreos that will fit on top of the cookie dough. No need to overlap. One single layer will do.
  10. Pour the brownie batter on top of the oreo layer and make sure it's evenly layers on top.
  11. Bake for 30-35 minutes. Test with a knife to see if the center is done. If the knife comes out clean, let the brownies rest before serving. If the knife comes out with batter still on it, allow the brownies to bake about 5 minutes more.
  12. Drool. Eat. Repeat
I'm pretty positive it can't get any better than this!
So bake em. Drool over em. Gobble em up. And tell me they aren't the world's BEST brownie!

Xx
Reilly

Friday, July 11, 2014

Fun Find Friday!

Happy FFF!
Fun Find Friday if you were out of the loop with FFF!
I figured since I spend a lot of time browsing the inter-Web and have stumbled upon some really cool things I would share my fun finds with you all!
Lets roll!
Sometime last week while looking for some baking ideas (don't know what I was thinking...I can't bake!) and I came across these babies!
BACON CRACKERS!
 (http://debbie-debbiedoos.com)
Umm hello this is pure genius! Bacon + Carbs....life can't get much better! This would be an awesome snack/appetizer to bring with you to a party or something. Likely I would eat them all before I got there but I would definitely make sure to Instagram them and then tell everyone how amazing they were and then its kinda like they got to try one themselves...kinda :p 
Check out http://debbie-debbiedoos.com/2014/05/how-to-make-bacon-crackers.html 
NOMOMOMOM!

Staying on the topic of food (one of my favs) another cool find of the week was
DRIED CANTALOUPE
Another brilliant idea! I don't know why this never occurred to me before to try considering my undying love for other dried fruit. But never in a dogs age would I have thought of this! Thank you sweet baby inter-Web for all the amazing things you bring to me!
Just Google how to make dried cantaloupe and oddles and oddles of recipes will pop up!
I first saw it here: http://www.fitsugar.com/How-Make-Dried-Cantaloupe-34910650

Moving away from food (sad I know) another fun thing I found this week online was;

MUST HAVE BEAUTY TIPS TO GET YOU THROUGH THE SUMMER!
These tips are actually really rather quiet great! I often just skip through articles like this but something made me do a double take and click on the link! Glad I did! Some real valuable tips!
See what I am blabbing about here: http://www.buzzfeed.com/candacelowry/must-have-beauty-tricks-to-get-you-through-summer

Something I found that made LOL literally for like ten minutes was;
PREGNANT IGGY PARODY VIDEO 
This amazing Iggy parody video I watched this morning!Please tell me this isn't the best one you've yet!!

HAHAHA you're welcome!

The next is a find I found that is more of a WTF find;
PETITION FOR BEYONCE TO COMB HER DAUGHTERS HAIR!
Um is this real life? Can someone atually petition this? Well apparently you can cause 1700 people have already signed it..WHAT?!?!
Don't believe me? Here it is: http://www.buzzfeed.com/juliegerstein/somebody-launched-a-petition-to-get-beyonce-to-comb-blue-ivy

Just a few of my finds this week! The internet ahhh what a great place to find fun things...and WTF things like petitions for people to comb their hair lol!
What fun things have you stumbled upon this week?!

Thursday, July 10, 2014

Hair to Beat the Heat

Hey beautiful dolls!
So if any of you have hair like mine (aka a frizzy long lions mane with a life of it's own -- and when I say lions mane I mean it literally because I have red hair!) summer heat is not always the easiest. As someone with long thick wavy.. errr more frizzy hair I've had to learn how to keep it at bay! And don't even get me started when the humidity rolls around. My lions mane then goes from 1 to 10 in about 2 minutes! 
So over the years I've learned that when the hot hot hot days come around my days of wearing my hair are over!
What I have done is created  a pretty extensive repertoire of hair dos for me to fall back on!
I will admit it's taken me a little while to get the hang of doing cute up dos to myself but thanks to the millions of YouTube gurus out there and all their tutorials I've gotten half decent!

Here are some of my fav go-tos that I rely on a lot for day to day during the hot hot hot days when my hair just CAN NOT be down!

Braided Mid-height Bun
(photo from Pinterest)


Low Bow
(photo from Pinterest)


Sleek Bun
(Photo from Pinterest)

A Simple Twist
(photo from Pinterest)

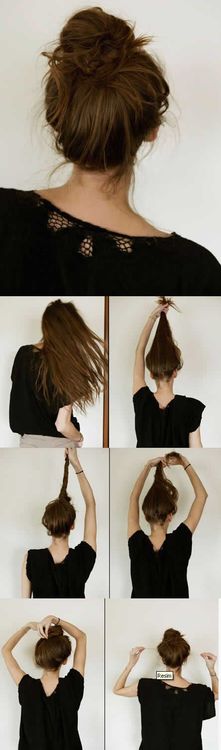
Messy High Bun
(photo from Pinterst)

These are my go-to up dos to keep my hair out of my face when the heat just makes it more of a frizzy sticky mess than it is on its own!
So the next time you can't handle all that hair all up in your face try one of these up dos, they haven't failed me yet!
Xx
Rei

Friday, July 4, 2014

Merica!

July 4th is right around the corner and to get the party started (Cue Pink's song Get the Party Started circa 2001) I've got some fun festive Independence Day DIYs!

1. Mason Jar Lanterns

How cute to light up your yard!
For DIY instructions: http://addicted2diy.com/2014/06/02/patriotic-mason-jar-lanterns/

2. Flag Shorts

How cute are these to rock to your July 4th festivities?!
For DIY instructions: http://ascotfriday.typepad.com/ascot_friday/2011/07/diy-american-flag-shorts.html

3. Fringed Flag Shirt

Or another cute and festive option!
For DIY instructions: http://oneofeachblog.com/diy-american-flag-fringe-shirt

4. Marshmallow Pops

Because being on a stick instantly makes food tastier and more appealing!
For DIY instructions: http://blogs.babycenter.com/life_and_home/kid-project-red-white-and-blue-marshmallow-pops/

5. Firecracker Popcorn

How much do you want to face plant into this right now!?
For DIY instructions:http://thenerdswife.com/firecracker-popcorn.html

I can't wait to get my craft on with these fun Merica themed DIYs!

Happy Independence Day my loves
xx

Wednesday, June 4, 2014

Get the Perfect Fancy Hands for this summer!

One thing I love more than anything is a fresh new manicure! I think having hands that are well taken care of is important and can give a great impression when meeting new people and shaking hands. I mean no one really enjoys shaking hands with rough dry hands that closely resemble that of a car tire! Oh and manicures make me feel fancy!
Of course my budget does not exactly allow for me to indulge in this pleasure as frequent as I like so I make shift and do my own. Getting a manicure is one of my guilty pleasures, of course with trashy reality TV (I just can’t seem to pull myself away from those dang Real Housewives!) and any baked good –preferably of the homemade variety, but I’m not too picky! So being a girl on a budget but still wanting to indulge in my guilty pleasure of perfectly manicured nails, I do it myself! – Of course well watching The Real Housewives and eating freshly baked brownies!
The first key to up keeping my hands is to ensure they are soft as a baby’s bottom! I mean you never know when prince charming could just walk right up and kiss you on the hand like in the movies (perhaps just me being a hopeless romantic, but hey at the end of the day my hands are smooth and silky none the less!).
My current favorite hand creams that I think work great:
Warm Vanilla Sugar from Bath and Body Works
 
Burts Bees Hand Salve

These are what I’m using currently but I am always on the prowl for new ones! Next step is filing my nails and cutting my cuticles. Both my least favorite part of the process but essential for well groomed nails!
I must warn you though if, you’ve never used a cuticle clipper and are going to be careful! Because if you aren’t you will hack your hands up! You can pick up nail filers and cuticle clippers at any drugstore! The brand of both I’m loving at the moment is Revlon. I grabbed both of mine at Wal-Mart.
Once I have masterfully used the cuticle clipper without drawing blood I use a cuticle oil to prevent any damage or splitting of my cuticles. Right now I am using Apricot Cuticle Oil by Essie. I’m a big fan of this one and it’ll take a miracle likely for me to switch to another one!

After I take a cotton ball with a little bit of nail polish remover on it and go over all my nails to get the excess oil of my nails. This helps make the nail polish actually stay on longer.
First I put on a base coat, right now I’m using OPI! I didn’t start using a base coat actually until recently but I really feel like it makes a difference!
I then spend about two episodes worth of The Real Housewives debating what color to paint my nails. It usually comes down to me asking my roommate to chose between two colors that to any male would look identical, but any women would clearly be able to see the difference between the two. After about a ten minute debate which one will look better with my work uniform (which is all black—so really this whole outfit matching talk is pointless yet we still seem to always have it!).
The few colors I’m loving right now are:
OPI – Perfectly Red
I always can really on a classic red like this! Classy and you can never go wrong!

China Glaze – Fast Track
I feel like I could wear this with pretty much anything in my closet (including my all black work uniform ;p ) So for me it’s like the perfect neutral but has a little something extra extra!

Revlon – Blue Lagoon
I love this color if I’m looking for something a bit brighter. I can’t help but be happy when this colors graces my nails!

Those are the top three that I have been using the most lately! I’m pretty plain Jane when it comes to painting my nails. I never do any cool designs or ombre and not because I don’t like them because I really do! I just know I would royally butcher it, and it would likely end with nail polish remover all over my coffee table…okay that actually happened once. And since that day I decided I wouldn’t try and get to fancy with my nails for awhile and I would leave that to the pros! Of course when I do splurge and go get my nails professionally done I do like to get something with a little more ‘wow’ factor!
But once I successfully paint my nails with my color of choice I command myself to sit still and let them dry completely before putting my top coat on. Of course this ruins my snacking but I tell myself I can go at least 20 minutes without touching a brownie and this tends to work – most the time! The top coat I’m using that I am really enjoying right now is Nicole by OPI. It seems to be doing the trick pretty well!


Also an expert tip I've picked up in my many years at self manicures is when waiting for your nails to dry place your hands in the fridge/freezer this helps them dry a lot quicker! And is a bonus if you are like me and can't sit still long enough for them to dry on their own! Of course you may risk looking a little loony to anyone you live with but hey it's a sacrifice for quick drying nails I'm willing to pay!
Getting good at doing my nails has taken me some time to master but now that I have I must say that I do a pretty dang good job! I love having my nails done and feel naked without a color on them, anyone else feel like that?
Do you have any tips or tricks for longer lasting manicures? Please share with a fellow manicure lover!!
X

-Krimson Kutie

Thursday, May 15, 2014

Time to Think Inside the Box!

You know that age old expression think outside the box? Well I am here to tell you that it is time to start to THINK INSIDE THE BOX!

This sudden love of thinking inside the box of mine came with my new found knowledge of subscription boxes! No idea what a subscription box is? – no worries, I hadn’t the slightest what they were when I first heard the term. Subscription boxes are possibly one of the BEST (yes caplocks is necessary to explain my love towards these boxes) manmade creations ever. Bold statement, I am aware of that but I’m willing to fight it! Well that is of course until cloning Ryan Gosling becomes a thing – now that would be man’s best creation. Till that day subscription boxes will hold the title of most genius idea in my books!
Subscription boxes are just as they sound. Boxes that you subscribe to and receive, the exact same as you would a magazine. A new box comes right to your door step monthly! These boxes are filled with a variety of little goodies for you to try and test.
The idea behind a subscription box is that you will receive a certain number (generally between 5-10) of sample products to try before you go out and spend all your precious dollar bills on a full size product only to realize it was a complete waste of money. It also allows you to try other product you may never heard of that you may adore! So it’s basically all around win-win (like I said GENIUS IDEA).
Not all boxes come with sample products, some boxes are filled with craft supplies and instructions on how to create a craft with the given supplies. Some contain ingredients and a recipe for you to create some mouth watering concoctions. Whether you are vegan, a fashionista, makeup guru, health conscious, gluten free, crafter extraordinary, animal lover, fair trade enthusiast, tea connoisseur, wine loving, trend seeker, or fitness fanatic there is a box out there for everyone! I repeat, whatever you’re into there is likely a box out there that caters to it.
I love the idea behind subscription boxes and who wouldn’t love getting a new box at their doorstop every month full of goodies?
Here are some of the top subscription boxes in their categories:

For the Beauty Queen 
-          Birch Box ~ expect samples from high hand products and brand names to appear in your box (http://www.birchbox.com/)
-          Ipsy ~ products tailored to your likes are sent to you in a cute reusable make-up bag (http://www.ipsy.com/)
-          Wantable ~ although on the pricier side you will not be left disappointed with some full size products in your box! (https://www.wantable.com/)


For the Foodie 
-          Taste Guru ~ a box full of gluten free goodies to leave you satisfied! (http://www.tasteguru.com/)
-          Hello Fresh ~ this box comes weekly and is full of healthy ingredients and recipes for you to whip up a nutritious and    delicious meal (http://www.hellofresh.com/)
-          Fancy Food Box ~ this box has 5+ foods for you to try out and food pairing suggestions (http://fancy.com/things/290347423874683563/Fancy-Food-Box-Subscription)
-          Taste Trunk: Sweet ~ offering you 5-10 featured products to satisfy any sweet tooth Also includes coupons! (http://www.tastetrunk.com/pages/the-sweet-tooth-trunk)


For the Health/Wellness Devotee 
-          Honest Health and Wellness ~ pick your choice of 2 vitamins and mix and match each month! (https://www.honest.com/health-and-wellness)
-          holBOX ~ equipped with 5-10 holistic health, beauty, wellness and household products to help ease you into a holistic lifestyle (http://www.theholbox.com/)
-          Taste Trunk: Health ~ filled with snacks for the health conscious this box is full of goodies that will leave both you and your wasteline happy! (http://www.tastetrunk.com/pages/the-healthy-life-trunk)
-          Healthy Surprise ~ this box guarantees a wide variety of snacks that are all vegan, gluten, corn, soy and dairy free! (https://healthysurprise.com/)


For the Crafting Gal 
-          Craftistas ~ this box will offer supplies for a new craft every month, ranging from fashion related to home décor! (http://www.craftistas.com/)
-          Whimsey Box ~ sending you fun crafts and DIYs monthly – and free shipping! (https://whimseybox.com/)


For the Eco Conscious Ladies 
-          Daily Dose of Green ~ Samples of the best and most natural products on the market allowing you to test out the best on the market (https://www.facebook.com/dailydoseofgreen)
-          Eco Emi ~ promising 5-10 all natural fair trade products ranging from health and beauty to household supplies all wrapped up in eco friendly packaging. Showing you green can be chic! (http://ecoemi.com/)


Other Popular Subscription Boxes
-          The Bride Box ~ Ranging from flower suggestions, décor ideas to invite and party favor samples and ideas, this box is ideal for any bride to be! (http://www.thebridebox.com/)
-          JewelMint ~ custom pick jewelry each month that suits your style and taste! (http://www.jewelmint.com)
-          Nicely Noted ~ Your stationary will never looked so good 3 letter pressed cards and beautiful unique stamps each month (http://www.nicelynoted.com/)


These are just some of the hundreds and hundreds of subscription boxes out there! Like I mentioned, whatever you are into I guarantee there is a box out there for you! So think inside the box and you may just like what you find!

Until next time!
-KrimsonKutie

Friday, April 25, 2014

Need a fun DIY for poolside fun?

Need a fun DIY for poolside fun?

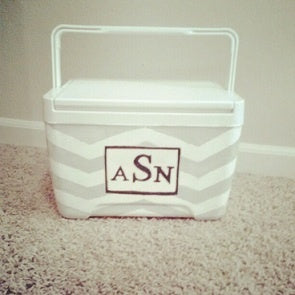
Cooler Painting DIY
Hello friends! Hope everyone is having a fab week! So I went over to a girlfriend’s house earlier this week and when I got there she was covered in paint. Like I’m talking it looked like a mob of second graders attacked her and paint was their weapon of choice. Literally, thinking that there may be an angry group of seven year olds hiding in her house I asked her what in the heavens was going on. She calmly explained to me that she was painting a cooler. You see, her boyfriend is in a fraternity and apparently painted coolers are all the rage. Anyways she showed it to me and I was rather impressed I must say.
I was still intrigued by the whole trend of painted coolers so when I got home I had to consult my friend I trust the most – Google (he never leads me down the wrong path!) . And well apparently painted coolers are popping up everywhere online and have been a thing for awhile (was I the only one not aware of this…)! And then something bad happened. I searched painted coolers on Pinterest – dohhh, and there went my afternoon. I’m now inspired to paint my own cooler! And with summer being right around the corner (well not until June 21 – or so my trusty pal Google tells me) now is the perfect time to spruce up a plain cooler to have for the summer! I mean soon it will be prime time for all the invites for BBQs, pool parties, bon fires and beach days to come rolling in and what a great idea to have a stylish looking cooler to store your drinks and snacks in! Genius I know!
So if you would like to join in on this cooler painting craze here is what you need:
Materials:
*A cooler (Thought this one was obvious, but I still felt obligated to include it) (side tip: when picking out our cooler try and pick one with flat surfaces as painting on bumpy/ridged surfaces will be a lot more difficult)
*Course and fine grit sandpaper
*Plastic primer (a spray paint version will work well!)
*Paint colours of choice
*Paint brushes
*Painters tape (optional)
*Stencils (optional)
*Tissue paper (optional)
*Sharpie
*Mod Podge

 Instructions:
1)     Sand the entire cooler to ensure that there bumps on the surface and the original coating has come off. You want to sand it until it is very smooth. Make sure to wipe the cooler once done sanding it.
2)     Prime the cooler with your plastic primer.
3)     Once you have planned out what you want to paint start off by painting your background, then allow it to completely dry.
4)     If you are potentially artistically challenged (like me) and want to trace something onto the cooler to paint over, you will need to pull up the image on your computer screen. You will then take the tissue paper and put it up to your computer screen and lightly trace the image onto the tissue paper with a pencil.
5)     Once you have the image you wish to paint on the tissue paper it is now time to transfer the image onto the cooler. Place the tissue paper where you want the image, then with your sharpie trace over the image. Once you lift up the tissue paper the sharpie should have transferred over to the cooler leaving you with an image or design for you to paint in!
6)     If you are an artist and want to free hand it, that totally works to!
7)     Once you have left it to completely dry (I suggest at least a full day to ensure no smudging) paint over the entire cooler with mod podge. This will help make the cooler more durable, especially at the beach in the sand!

And there you have it friends, piece of cake! Speaking of cake you could totally keep cake in your stylish new cooler for a little snack at the beach – have I sold the interest of a painted cooler to you yet? :P

Here are a few pretty awesome coolers that I found on Pinterest! Hope my cooler turns out just as cool (haha get it??) Okay okay enough of my bad jokes, I’m off to go wrangle up my supplies to get my cooler painting show on the road! Wish me luck and comment below if you have any tips or trick on cooler painting, or if you’re going to paint one too!

Until next time! xo #krimsonkutie